






I have been thinking about making my own cheese at home for some time now. Other than paneer (milk set with food acid such as lemon juice or vinegar to form cheese), I have never attempted to make cheese.
It seemed difficult, time consuming and above all, I could not find rennet or culture anywhere in our beloved capital city. Until recently, that was. Seeing that I received four litres of fresh goat’s milk as a gift, I decided that my first foray into the world of home cheese making would be Chèvre – fresh goat’s milk cheese.
The process is uncomplicated and straight forward (thus suited for beginners like myself) but even better; the cheese can be eaten immediately – no prolonged maturing is required.
Goat’s milk (in our part of the world at least) is an under-appreciated ingredient. Worldwide, however, the consumption of goat’s milk is far higher (about 65%) than the consumption of cow’s milk. Compared to cow’s milk, goat’s milk has several important health benefits:
Goat’s milk contains about 89% less Alpha s1 Casein, the protein allergen that causes allergic reactions to cow’s milk. Thus, those with cow’s milk allergies would probably be able to drink goat’s milk.
Because goat’s milk has smaller fat globules and more medium-chain fatty acids (such as caproic, caprylic and capric acid) it is easier to digest than cow’s milk. It is these acids that give goat’s milk products their characteristic tart flavour.
Goat’s milk is naturally homogenised. The smaller fat globules in goat’s milk combined with the fact that it contains no agglutinin means that goat’s milk does not ‘separate’ into milk and cream as does cow’s milk. Commercially produced cow’s milk is ‘homogenised’ a process whereby the larger fat globules in cow’s milk is broken down to remain suspended in the milk. This process causes the free radical Xanthine Oxidase.
Goat’s milk contains less lactose (milk sugar) than cow’s milk, and as a result is considered a better dairy option for those who struggle to digest lactose.
Goat’s milk is biochemically better suited for the human body than cow’s milk. It has greater amounts of essential fatty acids such as linoleic and arachidonic acid and significantly greater amounts of vitamin B-6, vitamin A, niacin and potassium. The latter means that goat’s milk causes an alkaline reaction in the body, whereas, potassium-deprived cow’s milk causes an acidic reaction.
As far as I know, goat’s milk is not produced on a commercial scale in Namibia. Thus, little is done by means of marketing or advertising to promote its use. Which is a shame really, given that we have a very large goat population in this country.
I, however, was determined to make the most of my precious four litres, so I decided to make some probiotic yogurt as well.
For the Chèvre, you’ll need a few things: a good thermometer, some cheesecloth, a large pot, some rennet, non-iodized salt and a few spare hours.
It is important that you use non-iodized salt, because the iodine will kill all bacteria and cultures that are needed to make cheese. Furthermore, use only non-chlorinated water to dissolve your rennet.
Rennet usually comes in two varieties: animal and vegetable. Animal rennet is a collection of enzymes that occurs in the stomach of young animals that helps with the digestion of their mothers’ milk.
Cheese makers use it to coagulate the milk, to allow curd to form and separate from the whey. Vegetable rennets are extracted from a variety of plants that include dried caper leaves, certain types of ivy, nettles, and thistles.
In addition to rennet, a starter culture is required. These are divided into two types: mesophilic or thermophilic.
Mesophilic cultures grow at lower temperatures (typically around 25 – 30°C depending on the brand) and is thus most commonly used for homemade cheeses).
Other cultured dairy products such as kefir and sour cream also require a mesophilic starter culture.
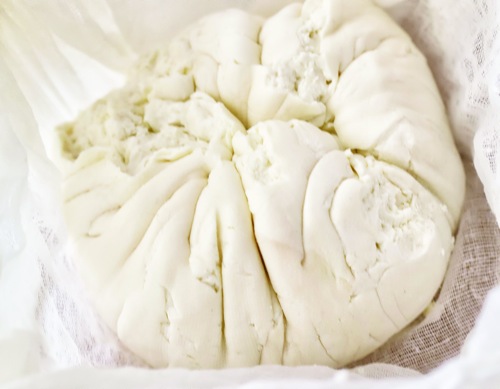
I was surprised at just how easy it was to make fresh Chèvre. First, I heated the milk to 25°C. Next I sprinkled a very small amount of mesophilic starter into the milk and left it for about five minutes to rehydrate. Next, I dissolved the rennet in a small amount of water and added it to the milk. Stirred for about one minute, and left it to stand at room temperature overnight covered with a lid. The next morning the curd was set so I spooned it into cheesecloth (if yours are fancy, you could spoon it into a special cheese mould) and hanged it from the cupboard door for a day to dry. After drying, the cheese is salted and additional flavourings (such as fresh herbs) are added, and the cheese is ready to eat.
I must admit, I could not wait that long. I spooned some of the fresh curd into a bowl, added some hibiscus pollen, maple syrup and pistachio nuts and enjoyed a most delightful, healthy breakfast. The curd had the texture of silken tofu and tasted like panna cotta.
• 2 litres of fresh goat’s milk
• 1/3 of a teaspoon of mad millie mesophilic starter culture
• ½ a tablet of mad millie rennet, dissolved in non-chlorinated water
• To taste non-iodized salt (cheese salt)
• To taste herbs (such as chives)
• Heat the milk to 25oC? in a large pot over medium heat. Stir to prevent the milk from scalding. Once the milk reaches the required temperature, remove from heat. Sprinkle the mesophilic starter culture evenly over the milk and allow to rehydrate for five minutes. Stir for a few minutes until the culture is well-blended into the milk. Dissolve the rennet in non-chlorinated water. Stir to dissolve and add to the milk. Stir for one minute until everything is well mixed. Cover the pot with a lid and set aside. Allow the milk to set for at least 12 hours.
• After 12 hours, the curd will have formed and separated from the whey. The curds are very fragile so they should be handled with great care. Spoon the curd into a fine cheesecloth laid over a sieve. Or if your are using cheese or feta moulds, cover the inside of the mould with fine cheesecloth and spoon the curd into the moulds. Leave to drain for at least one day, two if you have the time. Half way through the draining process, turn the cheese over in the cheese cloth. When done, the cheese should retain it’s shape. If you do not use moulds, fold the four ends of the cheesecloth together and twist a few times until the cheese forms a ball in the centre. Tie off the ends with string to retain the ball shape. Hang the cheese from a cupboard door (or something similar) with a bowl underneath to catch the whey. Hang for one or two days and turn the cheese halfway during the process.